Improve your Orienteering Skills using a HeadCam: Part 3

Posted by Jan Kocbach, 30 Mar 2011@5:00

gopro-hdIn this third part of the series, we take a look at how to use a HeadCam to improve your general orienteering technique. This includes your map reading technique, where you look, how you focus and your orienteering flow. A lot of focus in this article is put on map reading technique – including discussions on combining HeadCam footage with other ways to record map reading characteristics (accelerometer).

The article series “Improve your Orienteering Skills using a HeadCam” consists of the following 6 parts:

Part 3: Improve general orienteering technique

Mapreading frequency has been the thing I have looked most at (Olav Lundanes)

Improving the general orienteering technique using a HeadCam is a lot more tricky than looking at specific mistakes/time losses like we discussed in part 1. It is also a very time consuming process to do it systematically. The one doing the analysis should be rather skilled in understanding of orienteering technique – typically a coach or somebody who has worked with orienteering for many years. The setup is very similar to part 1 – see the table below for details.

Table: Overview of HeadCam analysis for improving general orienteering technique.

HeadCam mounting Either on the head, on the chest, or on the head of somebody running behind – depending on which part of the technique you are focusing on in the analysis.
Target level Elite runners on relatively high level to get the maximum out of it. For lower level, the analysis described in part 1 is more appropriate.
Who performs the analysis Most often the runner with help from coach/discussion partner. If the coach is to do the analysis, the runner must be tightly involved.
Required equipment A HeadCam is required (different HeadCams will be considered in the last part of this series). A GPS watch/GPS unit will make the analysis a lot easier/faster – and is required if a coach is going to participate in the analysis and give feedback. Special mounting arrangement if chest mounting is to be used. It is very advantageous to combine the HeadCam-video with an automatic map reading detection device/procedure in order to do the analysis more effectively and compare technique with other runners (more about that below).
Software A software tool which plays the HeadCam video synchronized with the GPS-data will make the analysis a lot easier/faster to perform (see part 1). It should also be possible to jump easily back and forth in the footage.
Typical analysis sessions

Most of the time I stand in front of the computer with the map in my hand and try to see how I moved the head and what my map reading frequency was (Thierry Gueorgiou)

This is a complex topic, so there is probably more than one answer (please add a comment below if you have some tips on the topic). However, I would say that typical analysis sessions can be divided into three different types:

  • Map reading technique. This is the type of analysis which is focused on by most elite runners when you ask them about the use of HeadCam for o-technical analysis. Typical aspects which are highlighted by the runners here are map reading frequency, map reading duration and map reading type – but as you will see in the discussions below this is only part of the story. Note however that HeadCam might not be the optimal tool for this analysis – more about that below.
  • Direction of view. Optimization of where you look and how you move your head. Do you look far enough ahead? Does it change when you get tired?
  • Orienteering flow. Combination of the two above – also including the way you move through the terrain.

Each of these type of sessions is considered separately below. There is some overlap between these types of analysis sessions, but I have divided into three types to be able to make a more structured discussion.

Map reading technique: Basics

To set the stage for the discussions, here are some thoughts about map reading and map reading technique:

  • Most (if not all) runners need to slow down in order to read the map due to (1) the need to keep the map steady and (2) the need to see the ground/terrain.
  • Relative speed reduction during map reading is usually bigger in terrain with bad runnability compared to terrain with good runnability. This is especially the case for terrain in which you need to look a lot at the ground while running. Relative speed reduction during map reading is lowest on roads/paths.
  • Speed reduction for short map reading events (1-3 seconds) is typically lower than for longer map reading events – especially in terrain with bad runnability – because you don’t need to slow down to see the ground/terrain for these shorter map reading events (you can make a mental picture of the ground for the next few meters and run on auto-pilot).
  • Not looking enough at the map (either too short map reading duration or too low map reading frequency) will lead to mistakes, or at least time losses due to a transition from short map reading events (confirmation type) to longer map reading events (retrospective – more about this below).

Thus it is evident that the sum of the total map reading time should be kept as short as possible, while on the other hand still reading the map enough to avoid time losses due to mistakes. Also, it might look like short map reading events are generally better than longer map reading events. For example, you would probably find that 5 x 2 seconds map reading slows you down less than 1 x 10 seconds map reading – at least in terrain with bad runnability. However the amount of information you get out from the 5 x 2 seconds compared to the 1 x 10 seconds is a different matter – this is were different types of map reading come into play. Thus it is dangerous to generalize and simply say that high map reading frequency/short map reading duration is good and long map reading duration is bad – it all depends on type of map reading. A proper combination of long and short map reading events is probably optimal (more about that below).

I notice that I read the map about 1-2 seconds when I’m prospective in my orienteering and longer when I run retrospectively – often 5-10 sec (Baptiste Rollier)

In the following a number of different map reading events are defined for the purpose of the following discussion. These map reading events are categorized by duration. Map reading events which are typically long are

  • Making a mental picture of the terrain
  • Refining the mental picture of the terrain (takes shorter time than making the original mental picture of the terrain)
  • Retrospective map reading, i.e. find out where you have run / where you are
  • Route choice/planning (comparing options for a leg/part of leg)

Map reading events which are typically shorter are

  • Checking a detail you just see in the terrain with the map
  • Checking direction (not actually a pure map reading event, but defined as one here)
  • Checking map for coming features to look for in the terrain based on your (a) already made mental picture of the terrain and (b) already planned route (can be defined as very quick update of mental picture of terrain)

These map reading events are somewhat similar to the ones described in a paper on map reading technique by Martin Lerjen, although there are some differences as it suits the focus of this article better in my opinion.

Map reading technique: Equipment

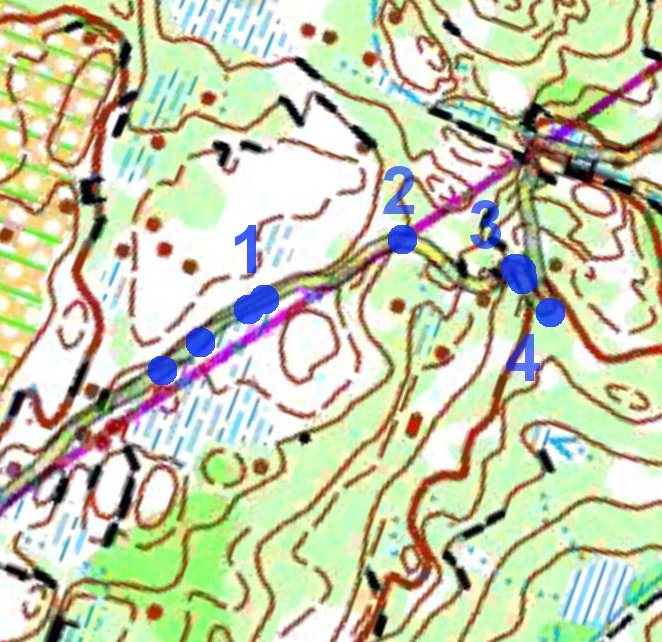
The use of headcam has been pointed out by many elite runners and coaches I have interviewed as being the chosen way to analyze your map reading technique. However, using a HeadCam video to analyze map reading characteristics is very time consuming. To make a full analysis, you have to look through the video and mark map reading events and map reading lengths on the map – as done in the example in part 2 of this article series (see map sample to the right).

A very good supplement for analyzing map reading technique, is using an accelerometer attached to your map reading arm/hand. It is a lot less time consuming (you can analyze your map reading after every training/event and make statistical analysis without spending much extra time) and it gives very interesting possibilities for comparing map reading characteristics between different runners. A combination of the use of HeadCam video and accelerometer is probably the best way to analyze your map reading technique.

Below an example of a recorded map reading using an accelerometer is shown for a specific leg. As you can see, you here get a lot of information directly from the unit, without having to look at the HeadCam video. The accelerometer applied here is another one than the one used in this earlier article at o-training.net, but any accelerometer with data logging ability will do (there are quite a few on the market). I have also tested with an iPhone/iPad /Android phone, and except for it being awkward carrying it below the map and it affects your compass, it gives you the data you need when using appropriate applications.

mapreadingsample_table_s

Map reading technique: Analysis

With the basics about map reading and the equipment set, we are ready for analysis and training approaches. A very important point for the analyzing of map reading technique is that the runner has to be an integral part of the analysis, as it is often not possible to categorize the map reading events based on the HeadCam video or the accelerometer data. The duration of a map reading event in itself does not tell which type of map reading event it is. This information must come from the runner him/herself.

Typical analysis techniques for analysis of map reading characteristics are given in the table below. I consider this a work in progress – so please add your comments below.

Table: Typical focus points for analysis of map reading technique and characteristics.

Identify reason for specific time losses Already considered in part 2. Did the athlete look at the map often enough – or was the mapreading frequency too low ahead of the time loss? Did the athlete look at the map long enough to perform the task at hand? In many cases the mapreading frequency and/or characteristics (see below) is one of the factors behind a loss of time/mistake.
Analyze number of “unnecessary” long map reading events Generally one should try to reduce the number of “unnecessary” long duration map reading events, as these are the ones which slow you down the most. Try to convert as many of these into map reading events which are shorter. These long map reading events which you want to get rid off are often of the retrospective type, i.e. map reading events of the type “where have I run”. You can reduce the number of retrospective map reading events by planning in advance (good mental picture of the terrain and having a plan for the leg) and check often with short duration map reading events (checking map for details/direction or checking map for coming features).
Analyze relation between map reading and runnability As discussed above, relative speed reduction during map reading is usually bigger in terrain with bad runnability compared to terrain with good runnability. Using a combination of HeadCam footage and accelerometer data you can analyze if your technique is optimal in this respect (it is in an orienteers instinct to read the map where the runnability is best, but there is still often room for optimization if the runner targets this specifically). Would it be better to read the map 30 meters earlier/later and memorize for a longer period of time instead? This is tightly related to micro-routechoices and flow. Systematic analysis over time – and exercising with this focus – can help you improve this part of your map reading characteristics better than “the intuitive way”.
Analyze change in map reading characteristics through a competition/high intensity training (tiredness) Typically map reading characteristics can change during a competition due to tiredness. This is especially problematic if it leads to mistakes. This can be evaluated using a combination of HeadCam and accelerometer data, by compare map reading statistics and characteristics at the start of a competition with corresponding figures towards the end of a competition. Especially look at places with mistakes, but also look at general characteristics. Thierry Gueorgiou about his HeadCam experiences: - The first things I learnt was that my map reading frequency decreased during the race, which is obviously a sign of tiredness for me as I am use to keep it quite high.
Compare different runners Probably the most interesting way to analyze map reading characteristics is to compare the techniques of different runners in a team (elite level). For this to be feasible, accelerometer based data of map reading technique is required, as it takes a lot of time to analyze HeadCam footage. GPS tracks with map reading data overlayed can be compared, and characteristics discussed between runners/coaches in order to understand the strong and weak points in each runners map reading technique. Note that optimal map reading typically varies between individuals, but this is a way to understand weak and strong points. This analysis must of course be followed by targeted training to change the map reading in the desired direction if non-optimal map reading characteristics is identified.

Analysis is one thing – learning from the analysis is another matter. As always in o-technical training it is beneficial if the runner has a specific task for the training – i.e. to improve a special problem which has been identified earlier. In order to learn something from the map reading analysis, I have suggested a set of exercises in the table below in order to be able to evaluate the performance using HeadCam video and/or accelerometer data – and improve through repeated exercises and evaluation. These are not necessarily the best exercises – and most are not tested – but rather some exercises which it should be possible to use to train specific parts of the map reading. Please add a comment if you have other suggestions.

Table: Suggested exercises for map reading analysis.

Exercise: Optimize map reading with respect to runnability Run a high intensity orienteering training/competition in which you focus specifically on optimizing map reading with respect to runnability as discussed above. Evaluate based on the techniques discussed above. The exercise should be repeated several times – and analyze if there is improvement over time. It is not necessary to use HeadCam/accelerometer each time the exercise is done, but evaluation with HeadCam/accelerometer should be done from time to time. One variant of this exercise is to not run at 100% speed the first times you do the exercise, in order to have more time to focus on the optimizing of your map reading.
Exercise: Simplification The use of the combination HeadCam/accelerometer lends itself well to evaluating a runners ability to use simplification in their orienteering – there are not many other tools which are readily available for this. The idea is that when you manage to make a (good) simplified mental picture of the terrain, you can move through the terrain with shorter map reading events than if you have not made a good simplified mental picture of the terrain. However, this will (in most cases) come at the expense of using more time for the initial map reading event for which you make the mental picture of the terrain. The HeadCam/accelerometer combo lends itself very well to evaluate simplification. Note however that for the evaluation to be effective, you should (1) do subsequent trainings in similar terrain and/or (2) compare yourself with other runners on the same course. This evaluation is not the easiest thing to do, but it should be a possible a way to evaluate simplification (I have not seen many other ways to evaluate simplification exercises in orienteering).
Exercise: Running speed for map reading Most orienteers do some sort of training on minimizing the decrease in running speed due to map reading. However, as it is not easy to evaluate this decrease in running speed, one does not always take this as far as one can. Using the accelerometer approach it is possible to compare running speed with map reading with running speed without map reading directly (using simple statistics). This possibility for evaluation makes this an interesting exercise. Note that such exercise should be done in terrain with approximately equal runnability in all of the terrain – because if the runnability varies an orienteer will instinctively read the map at the places where the runnability is the best…
Exercise: Shorten map reading duration for short map reading events If you haven’t tried to shorten the duration of your short map reading events, i.e. the check/confirm type of map reading events, there might be room for shortening it by targeted training on this feature. Reducing average map reading time for these short map reading events from 3 to 2 seconds, while still getting out the same information will be very beneficial. Targeted training on reducing map reading duration for a given amount of information withdrawal is thus something which should give possibilities for improvements. The good thing about the accelerometer setup is that you can easily get statistics regarding average map reading duration, and thus it is possible to directly evaluate if you manage to improve your map reading time for the short duration map reading events. Shortening these should increase your overall time loss due to map reading.
Exercise: Direction running technique Use of map (and compass) reading characteristics is a good way to analyze your direction running (compass course) technique – especially by comparing to others – as this is a very specific task for which it should be possible to identify an optimal technique.
Exercise: Make mental image of terrain and map memory (including simplification) An excellent capacity to build the whole picture of the leg you are running, i.e. high speed translation of the map to a mental (3D) image of the terrain in your head, is an integral part of a good map reading technique. If you don’t get the information from the map quickly enough (due to lack of practice or experience), you will (1) end up using a lot more time for your long map reading events to make a mental image of the terrain and (2) have to update it more often using semi-long map reading events (which might even need to be long map reading events). Also, if you don’t manage to simplify the terrain well enough, you will probably have to update your mental image more often. Also, doing the simplification fast is an important property. Thus you should focus on different exercises geared towards making a mental image of the terrain, simplification and map memory. A few exercises: Catching Features (probably the best exercise!), Map understanding exercises, Draw simplification map, Map memory and Map memory Duo. The HeadCam/accelerometer comes into play in the evaluation of your progress. The evaluation process must go over quite long time.
Optimal map reading technique

Is there such a thing as an optimal map reading technique? Here are two excerpts written by Johan Ivarsson and Bjørnar Valstad (according to the Okansas blog) – both regarding a WOC 1999 training camp:

  • - At a training camp with the Norwegian team before the 1999 WOC, they did a simple study of the number of times each runner looked at a map on a leg. The best men in the world that year — Petter Thoresen and Bjørnar Valstad — read the map more than 20 times on a 400 meter leg. Hanne Staff, who has been the best woman the last few years, read the map 15 times, while the worst of the women in the test read the map just 5 times (written by Johan Ivarsson, taken from Okansas)
  • - An unofficial study at a national team camp in 1999 showed that those who felt they boomed the least were also those who have the highest map reading frequency. This is logical. Orienteers who read the map frequently have a better chance of making corrections before they lose time. (written by Bjørnar Valstad, according to Okansas)

I [use the HeadCam to] look at the number of map readings and the type of map reading. Mistakes always start from lack of map reading or inefficient map reading (Philippe Adamski)

Thus one might make the simple conclusion that the important thing is to have a high map reading frequency. However, as discussed above, it is probably a lot more complicated than that. Here is another cite from the Okansas blog highlighting one example of high map reading frequency not being the straight way to perfection:

  • - Trying to look at [the map] every 5 seconds caused me to look at it quickly each time, but not really get any information from it. I also felt like I wasn’t spending enough time with my head up, looking around the woods. (comment by “Samantha”, according to Okansas)

Looking at the map without getting any information from it is a direct time loss. It is therefore of course important that you optimize your map reading in such a way that each map reading event gives you some additional information which is vital for your orienteering. So the question is – how to only look at the map (or compass) when you need it? The key to that is surely to be “ahead” in your orienteering at all times – because then you will know which information you need – and you will also know when you need to look at the map. Then most of your map reading event will be of the check/confirm type – i.e. map reading events which are short. This again means that you can have a high map reading frequency if the terrain demands it (if not, there is no reason to have a high map reading frequency). In addition you need longer map reading events to get a good mental picture of the terrain.

A runners ability to make mental images of the terrain will vary significantly – and there are also personal preferences. However, as I know you as a reader want it, I stick my head out and try to define a set of “optimal” map reading characteristics here:

  • Use long map reading events in order to make a good mental picture of the terrain at appropriate intervals. Spend enough time for these map reading event to make this a simplified image of the terrain in your head. Depending on runnability and capabilities, this long map reading event might be divided into several shorter map reading events which each are part of the “puzzle”. You typically have few of these long map reading events.
  • Use semi-long map reading events to update this mental picture of the terrain. Either to better remember the mental picture or extend it to a larger area. There are typically more of these than the long ones.
  • Use short map reading events – typically with high frequency if the terrain requires it – in order to check/confirm your mental picture, add small details to your mental picture (i.e. stones). This could also include compass check events. These would typically be the map reading events used most often.
  • In order to be able to keep a majority of your map reading events short, you need to be ahead in your orienteering, so that most of your map reading events can be of the check/confirm type.

Note that this is just one suggested set of “optimal” map reading characteristics. It might not suit all runners, and there might be alternative approaches which are equally good or better. For example, an other approach could be to make an extremely detailed mental image of the terrain with the long and semi-long map reading events (this is difficult, but some my manage to train it), and thus making many of the short map reading events unnecessary. However, it you look at the top elite runners today, most of them have a technique which involves a relatively high map reading frequency.

Head movement – direction of view – focus of view

After some time [into the race], I was looking far shorter ahead, and just focused on objects in front of me. It was quite easy to see that on the [HeadCam] video (Gueorgiou)

In addition to map reading technique, another important part of the orienteering technique which may be analyzed and trained using a HeadCam is your head movement and where you look/focus in the terrain. As for analyzing map reading technique, the runner must be part of the analysis of the HeadCam video. The analysis is easier if the runner can help categorizing the focus of view, i.e. why the runner looks in a specific direction during the course. It is a tough job to characterize “each look” the same way as each map reading event is characterized, but using that type of approach in the analysis will make it easier to understand how the technique can be improved.

Characterizing the time you spend to look around in the terrain makes it possible to understand if you use enough time for all the required tasks. In particular, it is interesting to compare this characterization with specific mistakes.

I don’t try to give an optimal technique here, instead I list the trouble you get if you don’t have time to  look at all the things you need:

  • If you don’t search actively for specific features in the terrain, you will not be able to spot them early enough. Thus it will probably lead to time losses.
  • If you only actively search for specific features close to where you are, and not far ahead, you loose potential time gains due to reduced need for map reading/lower risk/higher running speed.
  • If you don’t look far ahead for steady direction, your ability to run straight is decreased.
  • If you don’t compare terrain with mental image of terrain, it will be more difficult to spot mistakes.
  • Finally, good micro route choices are one of the deciding factors deciding between gold and silver on elite level. You need to make sure you have some time left to spot the good micro route choices…

In the table below I have tried to categorize different reason for looking in specific directions, in order to make it possible to characterize what you see on the HeadCam footage.

Active focus/search for specific features How is the interplay between which direction the runner looks and the mental picture of the terrain, i.e. does the runner actively look for features which are important for the controlling the position on the map (or more accurately, the position in the mental image of the terrain). A skilled orienteer who is well ahead in the orienteering (i.e. has a mental picture of the terrain) will look for specific features (or event the control point) in order to confirm the position. Remember also to think about simplification in this regard.
Look for specific features far ahead This is actually a part of “active focus on specific features” above, but important enough to deserve its own mention in this table. Spotting features far ahead may reduce risk significantly, and also lead to reduced need for map reading and increased running speed. Ideally the runner should look for specific features far ahead based on the mental image of the terrain. This makes it easier to spot specific details. Additionally, good knowledge of the terrain type makes it possible to know which details are visible and distinct from far away – making spotting specific features far ahead even easier.
Look far ahead for steady direction Looking far ahead is important in order to keep a steady direction. Does the runner look far enough ahead – and often enough – during direction running?
General comparison of terrain with mental image of terrain Looking in all directions in order to compare the mental image of the terrain with the actual terrain is an important strategy in order to reduce time loss due to mistakes, i.e. understanding the mistake as soon as possible due to spotting features which are not part of the mental image of the terrain (or alternatively not spotting features which should be there). A map reading “check” event is then needed to check/update.
Micro route choices Looking actively for good micro route choices is an important part in moving fluently through the terrain. Does the runner look specifically for good micro route choices, or is all the available time used for map reading, looking for specific features and looking at the ground in order to run fast.

As for map reading characteristics, exercises and evaluation are important tools in order to improve. My best advice in this regard is to choose one or two of these tasks as focus areas, and focus on them on a high intensity training where you run with a HeadCam. After the training, you evaluate the HeadCam footage while comparing the footage with your memory of why you looked where. As always, there is probably most to learn in the areas for which you had time losses. Using the setup with 3DRerun or Attackpoint in part 1 you can easily analyze the areas of interest.

Orienteering flow

I have looked a lot at the way I behave in the forest [when studying the HeadCam footage] (Olav Lundanes)

The final part of this article is the “orienteering flow” – what all orienteers want to achieve. To analyze orienteering flow can best be characterized as a mental exercise – i.e. replaying the HeadCam video along with your mental replay of the run/competition/training. This is the optimum timing, composition and application of all the techniques/tools you have got. Analyzing the orienteering flow is looking at the small details – and see the purpose behind everything you do in the context of your orienteering technique and your abilities. It is the optimization of the interplay between map reading, where your mental focus is, where you look in the terrain, and how you move through the terrain.

Outlook: Part 4 – Use HeadCam as an aid in visualization/mental training

In part 4 we look at how a HeadCam can be used as an aid in visualization and/or mental training. The last section in this part – orienteering flow – was a step on the way towards part 4. Part 4 is a lot shorter than this part, but still has some interesting aspects…

Thanks to Martin Lerjen and Thierry Guergiou for inspirational discussions via e-mail. Thanks also to several elite orienteers and coaches for interviews on the topic HeadCam and o-technical training. Full interviews with these elite orienteers/coaches will be published in part 5 of this article series

Maps: Training camp time

Posted by Jan Kocbach, 18 Feb 2011@5:00

February and March is training camp time in the warm & sunny countries, and now a lot of interesting maps have started to pop up daily at omaps.worldofo.com by various runners from training camps the last weeks and months. Some of these maps are collected below. Take a look at the maps – map study is always good technical training!

Looking at the webpages of the runners and in their map archives, a lot of runners have chosen Barbate, Spain for their training camps this February. Also, some of the maps posted below are from Turkey and from Slovenia. Enjoy!

February 6th 2011 – From webpage – Gernot Kerschbaumer
Map 4: sunshine all week long

Gernot Kerschbaumer
From webpage
February 6th 2011

Map info

Map found at Gernot Kerschbaumer website. From news item: sunshine all week long

February 11th 2011 – Doma map archive – Andraz Hribar
TK Kras, 1

Andraz Hribar
Doma map archive
February 11th 2011

Map info

Route choices, compass. Blatnice, Dani, Slovenia. Training. OK Brezice.

Country: Slovenia

Location

» View map overlay in Google Earth

February 13th 2011 – Doma map archive – Matija Razum
Training camp Kras (Slovenia) – Training 4

Matija Razum
Doma map archive
February 13th 2011

Map info

Generalization, compass.. Pliskovica, Slovenia. Training.

Country: Slovenia

Location

February 12th 2011 – Doma map archive – Matija Razum
Training camp Kras (Slovenia) – Training 3

Matija Razum
Doma map archive
February 12th 2011

Map info

Generalization, relocation, corridor, co. Vilenica, Slovenia. Training.

Country: Slovenia

Location

February 13th 2011 – From webpage – Martin Hubmann
Map 2: sonnig – sandig – spanisch

Martin Hubmann
From webpage
February 13th 2011

Map info

Map found at Martin Hubmann website. From news item: sonnig – sandig – spanisch

February 13th 2011 – From webpage – Martin Hubmann
Map 4: sonnig – sandig – spanisch

Martin Hubmann
From webpage
February 13th 2011

Map info

Map found at Martin Hubmann website. From news item: sonnig – sandig – spanisch

Country: Spain

Location

February 14th 2011 – From webpage – Simone Niggli
Map: Sonniges Spanien

Simone Niggli
From webpage
February 14th 2011

Map info

Map found at Simone Niggli website. From news item: Sonniges Spanien

February 14th 2011 – From webpage – Simone Niggli
Map 3: Sonniges Spanien

Simone Niggli
From webpage
February 14th 2011

Map info

Map found at Simone Niggli website. From news item: Sonniges Spanien

February 4th 2011 – Doma map archive – Eva Jurenikova
Sprint Side old town

Eva Jurenikova
Doma map archive
February 4th 2011

Map info

Side, http://www.eontours.com, Turkey. Training.

Location

» View map overlay in Google Earth

February 2nd 2011 – Doma map archive – Eva Jurenikova
Chasing start Gebiz

Eva Jurenikova
Doma map archive
February 2nd 2011

Map info

Gebiz, Antalya, http://www.eontours.com, Turkey. Training.

Country: Turkey

Location

» View map overlay in Google Earth

February 1st 2011 – Doma map archive – Eva Jurenikova
Line-O Lara

Eva Jurenikova
Doma map archive
February 1st 2011

Map info

Lara, Antalya, http://www.eontours.com/, Turkey. Training.

Country: Turkey

Location

» View map overlay in Google Earth

February 1st 2011 – Doma map archive – Eva Jurenikova
Sprint Antalya old town

Eva Jurenikova
Doma map archive
February 1st 2011

Map info

Antalya, http://www.eontours.com, Turkey. Training.

Country: Turkey

Location

» View map overlay in Google Earth

January 30th 2011 – Doma map archive – Eva Jurenikova
Kursunlu middle

Eva Jurenikova
Doma map archive
January 30th 2011

Map info

Kursunlu, Antalya, http://www.eontours.com, Turkey. Training.

Country: Turkey

Location

» View map overlay in Google Earth

January 30th 2011 – Doma map archive – Eva Jurenikova
First training Turkey

Eva Jurenikova
Doma map archive
January 30th 2011

Map info

Kursunlu, http://www.eontours.com, Turkey. Training.

Country: Turkey

Location

» View map overlay in Google Earth

February 15th 2011 – Doma map archive – Martin Vister
Samling i Spania – kurve

Martin Vister
Doma map archive
February 15th 2011

Map info

La Brena (El Jarillo), Spain. Träning. Jarla IF Orientering och Skidor.

Country: Spain

Location

» View map overlay in Google Earth

World Champs Cross Country Skiing coming up!

World of O’s sister-site for cross country skiing, World of XC is organizing WhoWins for the Cross Country Skiing World Cup. With the World Champs coming up, it is time to get ready for some exciting days with Cross Country Skiing. Why not start by setting up your predictions for the races in Drammen the weekend ahead of the World Champs?

Video: Follow Gueorgiou in Portugal – and draw his route

Posted by Jan Kocbach, 07 Feb 2011@23:32

Map sample
You don’t often get to see Thierry Gueorigou in action for 15 minutes – followed by a camera. Quite shaky – and not the best video quality admittedly – but still a nice one to watch in order to see how the master does it. And if that’s not enough to get some o-technical learning from it: Draw his route on the map in the Webroutes below (forest orienteering + sprint) and compare yourself with others to see how well you hit! Can you spot the error in the end before Thierry?

Video and maps were posted at the Facebook page of I Meeting de Orientação de Gouveia. Thanks to Miguel Reis e Silva for updates about the competitions.

Video

Below you find the video and two Webroutes – one for the first part of the course and one for the second part. Take a look at the map below while watching the video, and try to draw along. In the last part Thierry makes a mistake and has to make a few seconds stop to read the map – can you spot the error before Thierry?

Tip: The second map is easier to follow, and a lot more interesting – so I would start with that one. That starts about 6 minutes into the video. Good luck! Open second map in separate browser window to draw along. And don’t fool yourself by rewinding the video to look a second time – draw based on what you see the first time.

Map – first part of video

Tip: Open the webroute in a second browser window so you can draw while you watch the video. Use a straight line between the places the video jumps.
Powered by WebRouteWorldofO.com

Map – second part of video
Powered by WebRouteWorldofO.com

Improve your Orienteering Skills using a HeadCam: Part 2

Posted by Jan Kocbach, 21 Jan 2011@5:00


In this second part of the series, we take a look at how to use a HeadCam to analyze mistakes and time losses for a given training. This is the most obvious way to use a HeadCam in your o-technical training – and also the type of analysis for which it is easiest to get results if you have the appropriate tools.

The article series “Improve your Orienteering Skills using a HeadCam” consists of the following 6 parts:

  • Part 1: Introduction and presentation of tools for analysing HeadCam footage along with GPS data
  • Part 2: Analysis 1 – Analyze mistakes/time losses from a given training/competition
  • Part 3: Analysis 2 – Improve general orienteering technique (map reading technique, where you look, where your focus is, and the orienteering flow)
  • Part 4: Analysis 3 – Use the HeadCam as an aid in visualization and/or mental training
  • Part 5: Interviews with top runners/trainers about their use of HeadCam in o-technical training
  • Part 6: Brief review of equipment

For this second part of the series, it is very advantageous to have a setup where you can play the HeadCam-video in sync with the map position, and easily change the map/video position to other spots on the course. A few such software solutions are considered in part 1.

Part 2: Analyze mistakes/time losses from a given training

It is quite amazing to see that you keep just some part of the race in mind and forget the others (Gueorgiou)

The most obvious use for a HeadCam for o-technical analysis is to use it to understand the reason for specific mistakes and/or time-losses on an orienteering course. The analysis method is very similar to a regular analysis session with traditional tools like split times and GPS data – the HeadCam footage is just an extra tool in order to help remembering what really happened, and better be able to study the details. As the procedure is so close to a regular analysis session, a complete analysis session is described in this article – including the “basic stuff”. If you want to skip the basic analysis stuff and only read about the HeadCam specific stuff, you can focus on the green tables below.

HeadCam analysis advantages

Some advantages compared to a regular analysis session of mistakes and time losses:

  • The runner can see if he really did what he thought he did ahead of a mistake/time loss
  • Specific details can be studied in much more detail in order to find the reason for the mistake (e.g. mapreading frequency/characteristics, compass use, where the athlete focuses, etc.)
  • The biggest advantage is for the coach, who gets a lot of extra information in order to understand the mistakes and time losses of the athlete compared to just looking at the GPS track/splits and talking to the athlete

Table: Overview of HeadCam analysis of specific time-losses.

HeadCam mounting Either on the runner or somebody running behind.
Target level All levels from youth until world class elite. However, for world class elite runners the other types of analysis described in the next parts of this article series are more useful.
Who performs the analysis Either the coach or the runner, although the runner must be available for discussion.
Required equipment A HeadCam is required (different HeadCams will be considered in the last part of this series). A GPS watch/GPS unit will make the analysis a lot easier/faster – and is required if a coach is going to participate in the analysis and give feedback.
Software A software tool which plays the HeadCam video synchronized with the GPS-data will make the analysis a lot easier/faster to perform (see part 1). It should also be possible to jump easily back and forth in the footage. It is also possible to do analysis without such a tool, but it is more time consuming, and you will probably not do it regularly.
Tips In addition to looking at the specific errors, it may also be instructive to look at the spots where a GPS analysis shows that there has been time loss compared to other runners due to micro route choices. In this case, it is very interesting to compare the headcam video of different runners to understand why one runner performed better than the other (for national team level runners).
Typical analysis session

This last step is actually the most important step in the analysis – don’t stop at step 3!!

A typical analysis session goes as follows

  1. Identify mistakes/time-losses by split times and/or GPS data.
  2. Position video and GPS to a position ahead of a mistake (you might have to go quite far back from the place where the time loss occured to find the real reason for the mistake/time loss).
  3. Replay the action several times, and identify the reasons for the time loss using a combination of video, GPS track and other information available about the situation. The HeadCam video may or may not help you identify the time loss – in many cases the traditional methods would have given the same answers – in other cases the HeadCam video will give you a better answer.
  4. After finding the reason for the time losses, identify how to act in the future to avoid this type of time loss. This should be defined in form of one or more tasks which can be trained on in a targeted way in future trainings/competitions – and then evaluated using a similar HeadCam analysis in the future. This last step is actually the most important step in the analysis – don’t stop at step 3!!

This is actually exactly the same as a regular analysis session, except you have more information due to  the video footage which lets you make an improved analysis. The following table lists specific things to observe and look for when performing a HeadCam video analysis:

Table: Things to look for in the analysis in order to identify the reason for time losses.

Mapreading frequency Did the athlete look at the map often enough – or was the mapreading frequency too low ahead of the time loss? In many cases the mapreading frequency and/or characteristics (see below) is one of the factors behind a loss of time/mistake. Note, however, that using an automatic map reading detection setup would give you easier accessible information than the HeadCam video for this type of analysis.
Mapreading characteristics Did the athlete look at the map long enough to perform the task at hand? I.e., mapreading to prepare a long stretch takes longer time than mapreading to check the direction. Mapreading characteristics are difficult to analyze based on video only – here the athlete has to remember as well. One important question in this regard is if the mapreading was ahead of the current position or behind the current position?  The discussion paper by Martin Lerjen on “Map reading characteristics” contains useful discussions about mapreading characteristics.
Compass/direction Did the athlete orient the map when looking at it? Did the athlete check the direction/compass at critical stages / often enough? Was the athlete accurate enough when checking the direction?
Look ahead Did the athlete keep up his head and look ahead for features?
Targeted search for features Did the athlete look for specific features (targeted head movement) based on his/her being ahead in the map reading? I.e. did the athlete know what to look for, and turn the head/glance towards the expected position of these features, or was the athlete behind in the map reading and just observed what was coming and searching for it at the map afterwards? See also discussions about visionary headstart in the discussion paper by Martin Lerjen – visionary headstart being defined as “what happens when you have a vision of the terrain to come, including specific technically significant features”.
Other reasons Other reasons which mostly could be analyzed just as well with a regular analysis. For these reasons the HeadCam video will usually not give you much extra information. Some of these are bad routechoice, no good attackpoint, bad speed adjustment, did not check control description, disturbed by other runners, bad concentration, no plan for the leg, bad distance judgement, errors on the map, control in wrong position, lost map contact, etc.

You get direct answers when you are training for a specific task (Kenneth Buch)

A typical analysis of a mistake/time loss gives a combination of these reasons (and maybe also other reasons) for the mistake/time loss. However – especially for athletes below the absolute top level – it may be possible to identify one main reason for the mistake/time loss.

The results of such an analysis of specific mistakes/time losses in a training or race should typically be just the same as for a regular analysis session with “old-fashioned” tools:

  • A list of reasons for mistakes during the race/training
  • An analysis of what the athlete has to focus on in order to avoid making this types of mistakes in the future, including a list of specific tasks to focus on in future trainings/competitions
  • A plan for how to evaluate any improvements over time
Example


To illustrate a typical analysis session, we take a brief look at an example from the WOC 2010 Middle Qualification course (part of a leg). This particular part of the leg  was identified based on the GPS track. The analysis was done in 3DRerun by comparing the HeadCam video with the GPS-track – a video of the analysis session is shown below including highlighting some of the things identified in the analysis (sorry for bad video quality, this is just an illustration of the method made using a screen-shot program).

To the right a map of part of the area around the mistake is shown, where map reading positions observed from the video are marked using blue circles and numbers from 1 to 4.

Here is a short analysis of what happens (play the video to see this in action):

  • In the part with good runnability (towards the point marked 1 on the map sample) there are quite a few map reading events. The runner looks well ahead, and controls the heading with the compass.
  • Between point number 1 and point number 2, there is 30 seconds of running without any map reading. Note also that when leaving point number one, no accurate compass heading was taken. The reason for this period with less map reading is worse runnability (keeping up map reading frequency/accuracy in areas with poor runnabilty – or alternatively stopping to read the map – has been identified as a problem with this runner earlier as well).
  • At point 2 there is a very short map reading event – too short to check compass or to check the map in detail. Reason is still the runnability. - I did not want to loose time by stopping and therefore continued, said the runner when going through the video.
  • After point 2, the runner had planned to continue straight, but did a 60-70 degrees turn to the right. Again there is 30 seconds without mapreading, this time with a wrong heading (60-70 degrees off compared to plan).
  • At point 3, the runner finds out that something is very wrong, and reads the map several times. One can note that the runner is not very accurate when aligning the map to north.
  • At point 4, the runner finally takes the time to align the map properly to north and read the terrain properly.


Note! You can also take a look at this particular case in 3DRerun with video and GPS track in sync if you have access to the closed beta of 3DRerun (see part 1 of this article series for how to participate in the beta-testing).

I always try to watch the video quickly after the training, because if you need to make improvements it has to be already on the next training (Gueorgiou)

Results of analysis and tasks given

Based on this analysis, it looks like the main reason for the mistake is that the runner did not take the time to read the map enough in the terrain with bad runnability. You could, however, also say that the runner was not enough ahead with the orienteering in the area with good runnability – by reading ahead it might not have been necessary to read the map much in the part with bad runnability. Thus, based on this analysis, the runner got two different tasks ; (1) When in rough terrain, read the map when necessary even if that means slowing down considerably and (2) Work on moving your focus further ahead, especially when approaching rough terrain.

Evaluation of these tasks should be done both in regular analysis of trainings/competitions, and using HeadCam video in future trainings. Note that these are only two of several identified tasks required to improve the orienteering – and not all tasks are focused on in every training/competition (typically a few tasks for each training).

Outlook: Part 3 – Improve general orienteering technique

In part 3 we look beyond the analysis of a specific mistake/time-loss, and instead take a look at how to analyze and improve the general orienteering technique. Important aspects in this regard is optimizing map reading technique, where your focus is, and the orienteering flow. This type of analysis is typically geared more towards the elite orienteer.

Improve your Orienteering Skills using a HeadCam: Part 1

Posted by Jan Kocbach, 19 Jan 2011@5:00

3D Rerun HeadCam Demo
Gueorgiou, Nordberg, Adamski and several other top runners use a HeadCam in their o-technical training to improve their technique. In this article series it is shown how YOU can use a HeadCam to improve your skills – or the skills of the ones you are coaching. Topics to be considered are the tools available, analysis methods, what you can learn from the analysis, and interviews with some of the top runners and coaches who have been using a HeadCam regularly in their training.

The first things I learnt was that my map reading frequency decreased during the race, which is obviously a sign of tiredness for me (Gueorgiou)

The use of a headmounted camera to study orienteers and orienteering technique has been done for a long time in research projects as you can see in this article from 1995 (full text version of reprint in SJO) – see also these two articles.

In the current article series “Improve your Orienteering Skills using a HeadCam” here at o-training.net, the focus is less theoretical. Instead it is focused on how you can use a HeadCam to improve your own orienteering skills.

Overview of article series

In this first part of the series, some very useful tools for analysis of a HeadCam video + GPS data are presented, as these tools make the specific analyses discussed later on much easier. Without adequate tools like the ones presented here, only the ones who are most determined to become World Champion will take themselves the time to regularly use a HeadCam as part of their technical training. With better tools along with cheaper and better HeadCams, these methods should be accessible to a much wider range of runners in the coming years.

In the following three parts, three distinct analysis techniques are presented and discussed:

  • Analyze mistakes/time losses from a given training/competition (Part 2)
  • Improve general orienteering technique: Optimize map reading technique, where you look, where your focus is, and the orienteering flow (Part 3)
  • Use the HeadCam as an aid in visualization and/or mental training (Part 4)

I think the absolutly best training is when I run at high speed, and some coach or teammate runs with the camera behind me. Then I can see everything (Nordberg)

Each of these parts is discussed separately, as both the method and the aim of the training/analysis is different for each case.

Finally there is one part with interviews of users on top elite level (Gueorgiou, Nordberg, Adamski, Buch etc.) – and a brief discussion of equipment.

HeadCam video + GPS: Some history

Since 2007 I have had a setup and code (as explained here) which allowed me to semi-automatically produce videos consisting of a HeadCam-video along with the GPS position on a map, including some extra information such as speed and pulse of the runner. The work time for making such a video was about 10-15 minutes + computer processing time. Some of the early example videos are the video of Simone Niggli’s route at the World Cup sprint in Finland ahead of Jukola 2007, including her narration, runthrough of the WOC 2007 sprint final (see 5 first minutes in better quality at Veoh), WOC 2007 middle runthrough with one picture every second and Norwegian champs sprint 2007. One of my latest examples is embedded below:

I have used a HeadCam for analysis around 30 times since June 2009 (Adamski)

Since 2007 I have had quite a few requests both by individuals and national teams about how they could do their own analysis with HeadCam video + GPS.

  • My usual recommendation was until about a year ago to just watch the video in one window on the desktop while having QuickRoute (why not donate something to Mats Troeng for his great work with QuickRoute while you are at it?) open in another window: When holding your mouse above any point on the QuickRoute route, you can see the time at the bottom of the QuickRoute window ; this time you can compare with the corresponding time on the video.
  • Since early last year, I have recommended to have the video in one window and 3DRerun running at real-time-speed in another window. By starting the video and 3DRerun at the same time, you get a dot representing your position moving on the map in sync with the video.

I have also heard that the Swiss team has had some tool (developed by David Schneider) to study HeadCam video and GPS together, but I have not seen it in action.


HeadCam video + GPS: The latest tools


Since a few weeks ago, there are several methods available which makes this type of HeadCam+GPS view more accessible and easy to use. After some discussions over at Attackpoint.org, Ken (the man behind Attackpoint) made a very nice solution in which you can see a HeadCam-video in sync with your position on the map. Since then, two other solutions have also been presented; all three methods are presented in some detail below:

    That’s absolutely stunningly amazing! What a great training tool (comment at Attackpoint)

  • The tool at Attackpoint can show your HeadCam footage along with your position on the map. You upload your gpx-route to Attackpoint, and upload your video at either Vimeo or YouTube. Your video can then be shown in sync with your GPS track – you can give a video offset if they don’t start at the same time. When you use the video slider to change the position in the video, the position on the map is updated. A great solution, which works very well! See one example here and another example here. Note that upload of gpx-files is only available to people donating to Attackpoint (but if you use the site you should consider donating anyway, Ken is doing great work with the site). To my knowledge the current version does not work with videos on your local computer, but I guess that may change in the future (at least implementing a local webserver version as done in 3DRerun – see below – should be quite easy – it might even be implemented as far as I know). This HeadCam + GPS feature is still being further developed at Attackpoint according to this article – so don’t be surprised if it just gets better in the coming weeks and months.
    attackpointheadcam

  • After seeing the very nice solution at Attackpoint, I have also included a HeadCam+GPS mode in 3DRerun. Here you can click (while holding the ctrl-key) on any point of the map, and the GPS + HeadCam-video will start from the closest point. It works with videos from YouTube, Vimeo and also videos using HTML5. The latter means that you can do your analysis without uploading the video to a server – which again means that you are up and running your analysis with GPS+HeadCam in sync only minutes after you are back from your training depending on the format of your video camera (some cameras need a conversion first – I am lucky with my Contour camera). To manage this, you must install a local webserver (which is done in 5 minutes).

    The 100 first to send an email to 3drerunbeta@ worldofo.com will get a password for the closed beta

    You can test an example of 3DRerun for video+GPS analysis here if you have access to the closed beta-testing of 3DRerun. If you are not part of the beta-testing, the beta-testing is being extended with up to 100 new beta-testers now. The 100 first to send an email to 3drerunbeta@worldofo.com will get a password for the closed beta. Note that you can also see an example of 3DRerun in action for video analysis at the bottom of this article (recorded video).

    If the need arises, i.e. if there is available data, it would also be possible to extend 3DRerun to show two videos at the same time in order to (1) compare micro route choices from different runners or (2) show footage from one camera mounted on the head and one from somebody running behind to get even more information.
    3D Rerun HeadCam Demo

  • Jarkko Ryyppö (Mr. RouteGadget) has made an offline tool which also gives approximately the same possibilities as the two tools described above, without having to upload the video to a server (see here for a screenshot and some discussion at Facebook). This works with even more video formats, but is currently just “a hack” which isn’t very easy to apply for anyone but Jarkko – a bit like my original scripts to make video+gps . I got to test it though, and it works very well. This might be a good solution for the future?
    jarkkoheadcam.
    Jarkko is also working on producing some very nice videos of HeadCam + GPS position – kind of like my scripts from 2007, but they look a lot better as you now have a double split view of the map and some extra features. See an example video here.

There might be other tools available – please add a comment below if you know about other tools.

Outlook: Part 2 – Analyze mistakes/time losses from a given training

In part 2 we start with the really interesting part of this article series – how to utilize these kind of tools to improve your orienteering skills. Part 2 covers how to analyze mistakes/time losses from a given training/competition. The video below gives an example of the use of 3DRerun for such an analysis. This particular example will be discussed in more detail in Part 2.

- How to become a WOC medal winner and other presentations

Posted by Jan Kocbach, 05 Dec 2010@16:00

howtowocmedal
“How to become a WOC medal winner” (Janne Salmi), “How can we improved the quality of the o-technical training” (Eva Jurenikova) and “Developments in the international elite orienteering” (Janne Salmi) were three of the presentations presented at Elittränarträffen in Sweden which  should be very interesting to the readers of o-training.net.

60 of Swedens elite trainers within orienteering were present at the Elittränarträffen – with some very interesting sessions. See below for some of the content – and link to the full presentations at the bottom of this article.

“How to become a WOC medal winner” (Janne Salmi)

skills

Janne Salmi presented the skills and qualities needed for a  top-orienteer based on a combination of previous knowledge and the coaches and athletes comments. Also included in the presentation was the background and training of the WOC medal-winners of Trondheim, both in their junior-years and in 2010.

There is a lot of interesting content in this presentation for anybody interested in getting to the top in orienteering. Some example content:

  • See above for big thumbnails of some slides related to how the skills and qualities vary through the years when going from a junior orienteer to an elite orienteer – this is of course also important related to where to put priorities in the training.
  • See below for big thumbnails of two slides related to training amount, 3000 meter times and some other data for the WOC 2010 medal winners both in their junior years and in their elite years.

You find the link to the complete presentation below – a lot of very interesting content here.

Presenting the skills and qualities needed for a
top-orienteer based on previous knowledge and
the coaches and athletes comments.
2. Presenting the background and training of the
WOC medal-winners of Trondheim, both in their
junior-years as in 2010.
3. “How to become a WOC medal-winner?”
Summary and take home messages for the
Scandinavian coaches.

skills2

“How can we improved the quality of the o-technical training” (Eva Jurenikova)

This presentation by Eva Jurenikova (Trainer of the Year in Sweden last year) is in Swedish language. The first part of the presentation is related to how important it is to have high quality in orienteering technical trainings – and also describing what is meant by high quality trainings. Some bullet-points,

  • High quality trainings gives motivation which again gives concentrated athletes. Concentration is needed in order to learn from the trainings.
  • Some tips for better concentration:  Use of GPS, A clear goal for each training, run in pairs, shorter trainings/divide a training into several shorter parts

Next there is some discussion about how to analysis your training/o-technical training. One of the tools mentioned here is 3DRerun (which is still in closed beta – I hope to get it out to you soon!) – another tool is statistics of mistakes.

The last part of the presentation gives a lot of nice training examples. Several of these are already in the orienteering exercises section of the O-training.net Wiki, but there are also several new ones which I’d like to get included in the o-training.net Wiki exercise section (please help out if you have time – you get an account for the o-training.net wiki here).

Below I have included three interesting exercises which I have not seen before – all of which seem to be very nice exercises.

  • The first exercise is a very good exercise for two persons on the same level when you have no controls in the forest. Each person carries one control – and there are two maps A/B. The runners meet at each blue control.
  • The second exercise is a direction exercise where you run on a course on a “white map”. There is a similar exercises in the o-training.net database (see also this one), the difference for the current exercise is that you stop at each control to take a look at the full map, and then run the leg on the white map. This introduces a new element of map memory, and you get closer to what you actually have in a competition situation.
  • The third exercise is the “Czech Relay” exercise which looks like a very nice high-speed exercise to train man-against-man. The course is back and forth over a road, and exchange is at each road crossing.

Find the link to the complete presentation of Jurenikova at the bottom of this page.

o-techneva

“Developments in the international elite orienteering” (Janne Salmi)

A very interesting presentation about the development in elite orienteering by Janne Salmi. Some parts of it are also interesting from an o-technical training point of view – especially the part about what the various disciplines are about (see the large thumbnails of a few slides below).

You find link to the complete presentation below.

salmi2

Full presentations

You find the link to the full presentations below – or alternatively in the “Overview articles” section of o-training.net where you also find a lot of other interesting resources related to o-technical training.

Analyzing your map reading technique – Automagically!

Posted by Jan Kocbach, 21 Nov 2010@16:00

Map reading sample from AMRD webpage
How often do you read the map – and how does it influence on your orienteering speed and the amount of mistakes you do? With an accelerometer attached to the map or to your hand – and combining this with GPS data – it is possible to display on a map at which locations and for how long a runner reads the map. This gives very interesting possibilities regarding analysis of what happens before a runner does a mistake – and also to see if the map reading frequency and length is optimal (see illustration above taken from AMRD webpage, © map: OLG Bern).

Swiss orienteer Michael Eglin has been working on a technique he denotes “Automated map reading detection (AMRD)” in which he uses an accelerometer (a device which can record its orientation relative to the ground) in order to record in which parts of the course a runner looks at the map. By combining this information with a GPS track of the route, the way the athlete reads the map can be analyzed.

Why is this interesting for you as an orienteer?

There are at least two very interesting applications for automated map reading detection:

  • Analysis of map reading technique compared to other athletes in order to determine if the map reading technique is optimal. For example to see if the map reading frequency is too high/low, if the map reading time is too long/short (can be coupled to other technical training), how map reading influences on running speed, stop-time at controls / out of controls / into controls for map reading, etc. Having a good map reading technique is vital for a top orienteer – see some discussion about map reading frequency in the o-training.net wiki. At a training camp with the Norwegian team before the 1999 WOC, they did a simple study of the number of times each runner looked at a map on a leg. The best men in the world that year — Petter Thoresen and Bjørnar Valstad — read the map more than 20 times on a 400 meter leg. Hanne Staff, who has been the best woman the last few years, read the map 15 times, while the worst of the women in the test read the map just 5 times.See here for an interesting comparison of map reading technique between two different runners – provided at the blog of Martin Lerjen (German text).
  • Analysis of map reading coupled to time losses for a specific race, for example to investigate the map reading ahead of mistakes to see if you can find a relation between too seldom/short map reading and a mistake and how much time you have used for route choices, etc. Martin Lerjen has done such a race specific analysis on his blog (and a second example) (German text) – finding several interesting results regarding the time losses and his map reading technique.
Examples from analysis

Martin Lerjen has done several interesting analysis using automated map reading detection – I have been allowed to provide some examples from Martin’s testing of the method here.

The first illustration is from a national race in Switzerland in October 2010 (Höhrohnen)- run by Martin Lerjen (see full analysis in German here). In the below illustration green color means mapreading – red means no mapreading (interchanging the colors might have been more intuitive?). From the map it is easy to see in which areas the runner reads the map, and in which areas there is no map reading. For this particular terrain there is quite a lot of red – i.e. running without reading the map.

02control

Zooming in on a particular location, you can see more details regarding the map reading technique.

04control

A second example provided is an example from a national sprint race in Einsiedeln, Switzerland (see the complete map in Routegadget here -  complete analysis in German see).  As you can see, there is a lot of mapreading involved in such a technical city sprint – most of the track being green.

01control

Finally, an example of comparing the map reading technique of two runners – this time again for the Höhrohnen case. The blue and red lines illustrate the accumulated map reading time of the two runners during the race – and the red/blue dots a histogram of length of map reading contacts (complete analysis in German here).

101014_Auswertung Vergleich

How does it work?

During map reading the hand of the athlete is in a typical position which is significantly different to the position during regular running. While reading the map, the athlete keeps the map close to horizontal – while the map is in a more vertical position while running. Thus, one can easily detect map reading by just recording the position of the hand. To do this, an accelerometer may be fixed to the map reading hand. The sensor moves and tilts with the hand, and from the recorded motion map reading events can be recognized.

See a full description of the method in the AMRD-webpage.

Equipment

Two electronic devices are needed – an accelerometer and a GPS logger. Eglin has been using a HOBO Pendant G Data Logger (Typ UA-004-64) from Onset as accelerometer which is available online for around 150 Euros. Any GPS logger with reasonable spatial resolution can be used (e.g. GARMIN GPS Watches) to track the runners position.

Mobile application

I started work on implementing this kind of accelerometer logging for logging of map reading time in a mobile application last year (as both Android phones and the iPhone/iPod touch have a built-in accelerometer which should have sufficient accuracy and frequency), but have not had time to finalize this work yet. It is, however, not a difficult task – and it should therefore be quite feasible to do this kind of analysis with holding your mobile phone or iPod touch under the map instead of buying a dedicated logger device. Some work is started for both an iPhone and Android application – I’ll try to get the work done during the winter months. If somebody else has worked on this already – please let me know in the comments. In a mobile phone, you can either use the built-in GPS or use an external GPS like a GPS watch (using an external GPS watch will give you better accuracy).

Keep it simple!

Posted by Jan Kocbach, 26 Sep 2010@22:11

Keep it simple!

This simplification exercise from the French Team WOC 2011 training camp in the Jura region found in the map archive of Vincent Coupat looks like a very good variant of the orienteering exercise “Run on a simplification map”. Making a good simplification exercise requires a lot of skill – and often making the exercise is even better training than running the exercise, as all of the simplification lies in making the map.

To get good value of running on a simplification map which you have not drawn yourself, it is important to do thorough work on analyzing the training afterwards. One part of this analysis could be to draw a new simplification map based on the outcome of the training.

Some resources related to simplification in o-training.net:

Maps from the WOC 2011 area on omaps.worldofo.com:

Routechoice Analysis Norwegian Champs Long H21

Posted by Jan Kocbach, 11 Sep 2010@21:16

The Norwegian Champs Long distance was organized in Indre Østfold today in a terrain which is very untypical for Norway. The terrain has many deep valleys, giving interesting routechoices. Below you find the routechoices of some of the best runners in the mens class on some of the decisive legs.

Before taking a look at the routechoices below, take a look at the course without routes here:

Note that all the split times given below are taken from the GPS tracking, and may differ by up to 10-15 seconds from the actual splits. Still, this is interesting for the routechoice analysis.

Leg 2-3

In the interview after the race, the winner Olav Lundanes told that his tactic was to run around in this hilly terrain to save energy. We see this already on the first long leg to the third control where Lundanes (dark blue) choose a variant to the right around the forbidden area. His main rival Carl Waaler Kaas choose a more direct route – like he did in most of the race – earning around 30 seconds on Lundanes on this particular leg. The two fastest of the top runners have chosen a left/direct approach on this leg.

At this point in the race, Waaler Kaas has a lead of around 40 seconds to Lundanes.

Screen shot 2010-09-11 at 7.52.04 PM

Leg 3-4

On leg 3-4 we again see that Lundanes goes far around to the left (80% longer than direct), while Waaler Kaas takes a more direct approach. And again Waaler Kaas is faster. Weltzien chooses a middle variant going through some green areas – loosing some time compared to the other runners.

Waaler Kaas has now increased his lead to Lundanes to nearly a minute.

Screen shot 2010-09-11 at 7.53.55 PM

Leg 5-6

The really long leg in this course was the leg from number 5 to number 6. Looking at the route choices of the top runners, we can see that the routes are spread over a wide area. Fastest of the top runners is Olav Lundanes (13:03) with a left variant in which he follows the field for the first part of the leg – running flat in high speed for large parts of the leg (34% longer than the direct line, average pace of 4:53 min/km). Waaler Kaas looses 45 seconds with a variant to the right which is much shorter (only 12% longer than the direct line with a lot of up and down, giving average pace of more than 6 min/km). Weltzien goes even further to the right, and is some seconds faster than Waaler Kaas. Wingstedt runs all the way around on the road to the left – running nearly 70% longer than the straight line with an average pace of 4:12 on the leg, being about one minute slower than Lundanes.

Waaler Kaas is still in the lead, but his lead has shrunk down to just above 10 seconds ahead of Lundanes in second spot.

Screen shot 2010-09-11 at 7.57.22 PM
Screen shot 2010-09-11 at 7.57.43 PM

Leg 6-19

The legs between 6 and 19 were not that interesting from a route choice perspective, but it was in this part of the course the race was decided. Waaler Kaas lost 2 minutes to control number 8 due to a mistake in the open, flat area. From 8 to 9, Waaler Kaas lost some time in the part with cliffs – and Lundanes choose some better micro route-choices on some of the other legs between control 9 and 18.

Leg 19-20

Again Waaler Kaas chooses a direct variant, whereas Lundanes goes around to the left. Lundanes runs 184% longer(!) than the straight line, and looses more than two minutes to Waaler Kaas who is fastest of the top runners on this leg. Tiltnes and Hott also go around to the left – running approximately the same time as Lundanes, whereas Wingstedt goes around to the right (137% longer), and looses even more than Lundanes.

This leg could have been very decisive for the overall victory, but Lundanes had a 4 minute lead on Waaler Kaas before the leg, and although Waaler Kaas got closer to Lundanes, the gap was still to big for Waaler Kaas to fight for the gold.

Screen shot 2010-09-11 at 8.01.22 PM

Summary

The course setter (Tore Sandvik) presented an interesting course with many route choice options. Carl Waaler Kaas choose the best option on most of the route choice legs with his direct route choices – however Lundanes might have saved more energy for the rest of the course due to his routes going around on the routechoice legs. I was not present at the championships – so I might have missed some points in the analysis above. If you have something to add to the analysis – either based on the GPS tracking, the splits, or because you were running – please add a comment below.

Results

Men 21

1 Lundanes, Olav Halden SK 01:34:12
2 Kaas, Carl Waaler Bækkelagets SK 01:35:18 +01:06
3 Weltzien, Audun Hultgreen Tyrving, IL 01:36:03 +01:51
4 Rollier, Baptiste Kristiansand OK 01:39:43 +05:31
5 Lucasen, Håvard Ås-UMB Orientering 01:39:53 +05:41
6 Karlsson, Mattias Halden SK 01:40:25 +06:13
7 Wingstedt, Emil Halden SK 01:42:52 +08:40
8 Tiltnes, Anders Tyrving, IL 01:43:23 +09:11
9 Hott, Holger Kristiansand OK 01:44:39 +10:27
9 Sagbereg, Torbjørn Tyrving, IL 01:44:39 +10:27

Women 21

1 Bagstevold, Heidi Østlid Bækkelagets SK 01:12:38
2 Wigemyr, Tone Bækkelagets SK 01:16:16 +03:38
3 Klechova, Vendula Halden SK 01:17:20 +04:42
4 Jahren, Silje Ekroll Raumar Orientering 01:18:41 +06:03
5 Holmström, Bodil NTNUI 01:20:54 +08:16
6 Bjørgul, Ida Marie Næss Halden SK 01:21:15 +08:37
7 Kahrs, Marianne Riddervold Fredrikstad SK 01:22:06 +09:28
8 Persson, Lina Kristiansand OK 01:23:25 +10:47
9 Bjerva, Elin Bækkelagets SK 01:23:41 +11:03
10 Palmer, Helen Suzanne Wing OK 01:25:42 +13:04
O-training.net

O-training.net will look into more interesting routechoice legs when the autumn darkness comes upon us the coming months. If you have legs or courses which are interesting for analysis, please send an email to jan@kocbach.net.

Also, remember that the O-training.net wiki is open to everybody for addition of o-training exercises and other stuff related to orienteering training. Please contribute!

O-technical training ahead of 10MILA

Posted by Jan Kocbach, 29 Apr 2010@5:00

When the old map from the competition area is available, it is always a good idea to do some theoretical o-technical training on the old map. For 10MILA, the old map is available (you could for example buy it from the 10MILA webpage). Most top teams and top runners have probably already made their preparations with the map – read on to see some of IFK Mora’s exercises.

IFK Mora has a very nice o-technical training webpage – in which most of their training exercises are shown. Eva Jurenikova – trainer of the year in Sweden in 2009 – is responsible for the training page. In December 2009, IFK Mora made theoretical o-technical training on the old 10MILA map – using the following exercises:

  • Exercise 1: Route choice. 7 different legs are shown with some route choice alternatives for each leg. The athletes shall choose the route they think is best, thinking either as a night orienteer or as a day orienteer (see also routechoice quizzes section of O-training.net)
  • Exercise 2: Tactics and drawing of simplification map. 10 different legs are given. For each leg, the athlete shall draw a simplification map, while thinking about the following points: Which object are to be passed, which lines are to be followed, what is easy to see in the forest, where do you have to be accurate with the direction, which object is the control placed on, etc. (see also drawing simplification maps in o-training.net)

The exercises are still online – you can click here to see the exercises on the old 10MILA 2010 map on IFK Mora’s webpage (Swedish language).

If you are running 10MILA on Saturday and haven’t yet taken a look at these exercises, you should definitely take some time to do it now!

Resources in o-training.net:

« Previous PageNext Page »