Improve your Orienteering Skills using a HeadCam: Part 2
In this second part of the series, we take a look at how to use a HeadCam to analyze mistakes and time losses for a given training. This is the most obvious way to use a HeadCam in your o-technical training – and also the type of analysis for which it is easiest to get results if you have the appropriate tools.
The article series “Improve your Orienteering Skills using a HeadCam” consists of the following 6 parts:
- Part 1: Introduction and presentation of tools for analysing HeadCam footage along with GPS data
- Part 2: Analysis 1 – Analyze mistakes/time losses from a given training/competition
- Part 3: Analysis 2 – Improve general orienteering technique (map reading technique, where you look, where your focus is, and the orienteering flow)
- Part 4: Analysis 3 – Use the HeadCam as an aid in visualization and/or mental training
- Part 5: Interviews with top runners/trainers about their use of HeadCam in o-technical training
- Part 6: Brief review of equipment
For this second part of the series, it is very advantageous to have a setup where you can play the HeadCam-video in sync with the map position, and easily change the map/video position to other spots on the course. A few such software solutions are considered in part 1.
Part 2: Analyze mistakes/time losses from a given training
It is quite amazing to see that you keep just some part of the race in mind and forget the others (Gueorgiou)
The most obvious use for a HeadCam for o-technical analysis is to use it to understand the reason for specific mistakes and/or time-losses on an orienteering course. The analysis method is very similar to a regular analysis session with traditional tools like split times and GPS data – the HeadCam footage is just an extra tool in order to help remembering what really happened, and better be able to study the details. As the procedure is so close to a regular analysis session, a complete analysis session is described in this article – including the “basic stuff”. If you want to skip the basic analysis stuff and only read about the HeadCam specific stuff, you can focus on the green tables below.
HeadCam analysis advantages
Some advantages compared to a regular analysis session of mistakes and time losses:
- The runner can see if he really did what he thought he did ahead of a mistake/time loss
- Specific details can be studied in much more detail in order to find the reason for the mistake (e.g. mapreading frequency/characteristics, compass use, where the athlete focuses, etc.)
- The biggest advantage is for the coach, who gets a lot of extra information in order to understand the mistakes and time losses of the athlete compared to just looking at the GPS track/splits and talking to the athlete
Table: Overview of HeadCam analysis of specific time-losses.
| HeadCam mounting | Either on the runner or somebody running behind. |
| Target level | All levels from youth until world class elite. However, for world class elite runners the other types of analysis described in the next parts of this article series are more useful. |
| Who performs the analysis | Either the coach or the runner, although the runner must be available for discussion. |
| Required equipment | A HeadCam is required (different HeadCams will be considered in the last part of this series). A GPS watch/GPS unit will make the analysis a lot easier/faster – and is required if a coach is going to participate in the analysis and give feedback. |
| Software | A software tool which plays the HeadCam video synchronized with the GPS-data will make the analysis a lot easier/faster to perform (see part 1). It should also be possible to jump easily back and forth in the footage. It is also possible to do analysis without such a tool, but it is more time consuming, and you will probably not do it regularly. |
| Tips | In addition to looking at the specific errors, it may also be instructive to look at the spots where a GPS analysis shows that there has been time loss compared to other runners due to micro route choices. In this case, it is very interesting to compare the headcam video of different runners to understand why one runner performed better than the other (for national team level runners). |
Typical analysis session
This last step is actually the most important step in the analysis – don’t stop at step 3!!
A typical analysis session goes as follows
- Identify mistakes/time-losses by split times and/or GPS data.
- Position video and GPS to a position ahead of a mistake (you might have to go quite far back from the place where the time loss occured to find the real reason for the mistake/time loss).
- Replay the action several times, and identify the reasons for the time loss using a combination of video, GPS track and other information available about the situation. The HeadCam video may or may not help you identify the time loss – in many cases the traditional methods would have given the same answers – in other cases the HeadCam video will give you a better answer.
- After finding the reason for the time losses, identify how to act in the future to avoid this type of time loss. This should be defined in form of one or more tasks which can be trained on in a targeted way in future trainings/competitions – and then evaluated using a similar HeadCam analysis in the future. This last step is actually the most important step in the analysis – don’t stop at step 3!!
This is actually exactly the same as a regular analysis session, except you have more information due to the video footage which lets you make an improved analysis. The following table lists specific things to observe and look for when performing a HeadCam video analysis:
Table: Things to look for in the analysis in order to identify the reason for time losses.
| Mapreading frequency | Did the athlete look at the map often enough – or was the mapreading frequency too low ahead of the time loss? In many cases the mapreading frequency and/or characteristics (see below) is one of the factors behind a loss of time/mistake. Note, however, that using an automatic map reading detection setup would give you easier accessible information than the HeadCam video for this type of analysis. |
| Mapreading characteristics | Did the athlete look at the map long enough to perform the task at hand? I.e., mapreading to prepare a long stretch takes longer time than mapreading to check the direction. Mapreading characteristics are difficult to analyze based on video only – here the athlete has to remember as well. One important question in this regard is if the mapreading was ahead of the current position or behind the current position? The discussion paper by Martin Lerjen on “Map reading characteristics” contains useful discussions about mapreading characteristics. |
| Compass/direction | Did the athlete orient the map when looking at it? Did the athlete check the direction/compass at critical stages / often enough? Was the athlete accurate enough when checking the direction? |
| Look ahead | Did the athlete keep up his head and look ahead for features? |
| Targeted search for features | Did the athlete look for specific features (targeted head movement) based on his/her being ahead in the map reading? I.e. did the athlete know what to look for, and turn the head/glance towards the expected position of these features, or was the athlete behind in the map reading and just observed what was coming and searching for it at the map afterwards? See also discussions about visionary headstart in the discussion paper by Martin Lerjen – visionary headstart being defined as “what happens when you have a vision of the terrain to come, including specific technically significant features”. |
| Other reasons | Other reasons which mostly could be analyzed just as well with a regular analysis. For these reasons the HeadCam video will usually not give you much extra information. Some of these are bad routechoice, no good attackpoint, bad speed adjustment, did not check control description, disturbed by other runners, bad concentration, no plan for the leg, bad distance judgement, errors on the map, control in wrong position, lost map contact, etc. |
You get direct answers when you are training for a specific task (Kenneth Buch)
A typical analysis of a mistake/time loss gives a combination of these reasons (and maybe also other reasons) for the mistake/time loss. However – especially for athletes below the absolute top level – it may be possible to identify one main reason for the mistake/time loss.
The results of such an analysis of specific mistakes/time losses in a training or race should typically be just the same as for a regular analysis session with “old-fashioned” tools:
- A list of reasons for mistakes during the race/training
- An analysis of what the athlete has to focus on in order to avoid making this types of mistakes in the future, including a list of specific tasks to focus on in future trainings/competitions
- A plan for how to evaluate any improvements over time
Example
To illustrate a typical analysis session, we take a brief look at an example from the WOC 2010 Middle Qualification course (part of a leg). This particular part of the leg was identified based on the GPS track. The analysis was done in 3DRerun by comparing the HeadCam video with the GPS-track – a video of the analysis session is shown below including highlighting some of the things identified in the analysis (sorry for bad video quality, this is just an illustration of the method made using a screen-shot program).
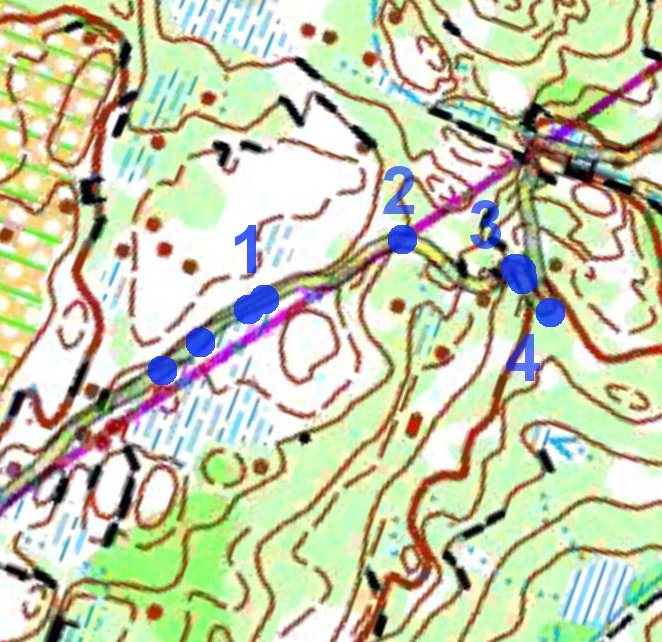
To the right a map of part of the area around the mistake is shown, where map reading positions observed from the video are marked using blue circles and numbers from 1 to 4.
Here is a short analysis of what happens (play the video to see this in action):
- In the part with good runnability (towards the point marked 1 on the map sample) there are quite a few map reading events. The runner looks well ahead, and controls the heading with the compass.
- Between point number 1 and point number 2, there is 30 seconds of running without any map reading. Note also that when leaving point number one, no accurate compass heading was taken. The reason for this period with less map reading is worse runnability (keeping up map reading frequency/accuracy in areas with poor runnabilty – or alternatively stopping to read the map – has been identified as a problem with this runner earlier as well).
- At point 2 there is a very short map reading event – too short to check compass or to check the map in detail. Reason is still the runnability. - I did not want to loose time by stopping and therefore continued, said the runner when going through the video.
- After point 2, the runner had planned to continue straight, but did a 60-70 degrees turn to the right. Again there is 30 seconds without mapreading, this time with a wrong heading (60-70 degrees off compared to plan).
- At point 3, the runner finds out that something is very wrong, and reads the map several times. One can note that the runner is not very accurate when aligning the map to north.
- At point 4, the runner finally takes the time to align the map properly to north and read the terrain properly.
Note! You can also take a look at this particular case in 3DRerun with video and GPS track in sync if you have access to the closed beta of 3DRerun (see part 1 of this article series for how to participate in the beta-testing).
I always try to watch the video quickly after the training, because if you need to make improvements it has to be already on the next training (Gueorgiou)
Results of analysis and tasks given
Based on this analysis, it looks like the main reason for the mistake is that the runner did not take the time to read the map enough in the terrain with bad runnability. You could, however, also say that the runner was not enough ahead with the orienteering in the area with good runnability – by reading ahead it might not have been necessary to read the map much in the part with bad runnability. Thus, based on this analysis, the runner got two different tasks ; (1) When in rough terrain, read the map when necessary even if that means slowing down considerably and (2) Work on moving your focus further ahead, especially when approaching rough terrain.
Evaluation of these tasks should be done both in regular analysis of trainings/competitions, and using HeadCam video in future trainings. Note that these are only two of several identified tasks required to improve the orienteering – and not all tasks are focused on in every training/competition (typically a few tasks for each training).
Outlook: Part 3 – Improve general orienteering technique
In part 3 we look beyond the analysis of a specific mistake/time-loss, and instead take a look at how to analyze and improve the general orienteering technique. Important aspects in this regard is optimizing map reading technique, where your focus is, and the orienteering flow. This type of analysis is typically geared more towards the elite orienteer.


 .
.